TeamSpeak 3 Server Permissions & Security Configuration
TeamSpeak 3 Server Permissions & Security Configuration
TeamSpeak 3 Server Permissions & Security Master Guide
- This guide outlines the step-by-step procedure for configuring a TeamSpeak 3 or 6 server using the Advanced Permission System. It covers establishing a secure administrative hierarchy to prevent server hijacking, locking down channels, hiding channel occupants, configuring granular channel access, and tuning operational server settings.
Used for the guide
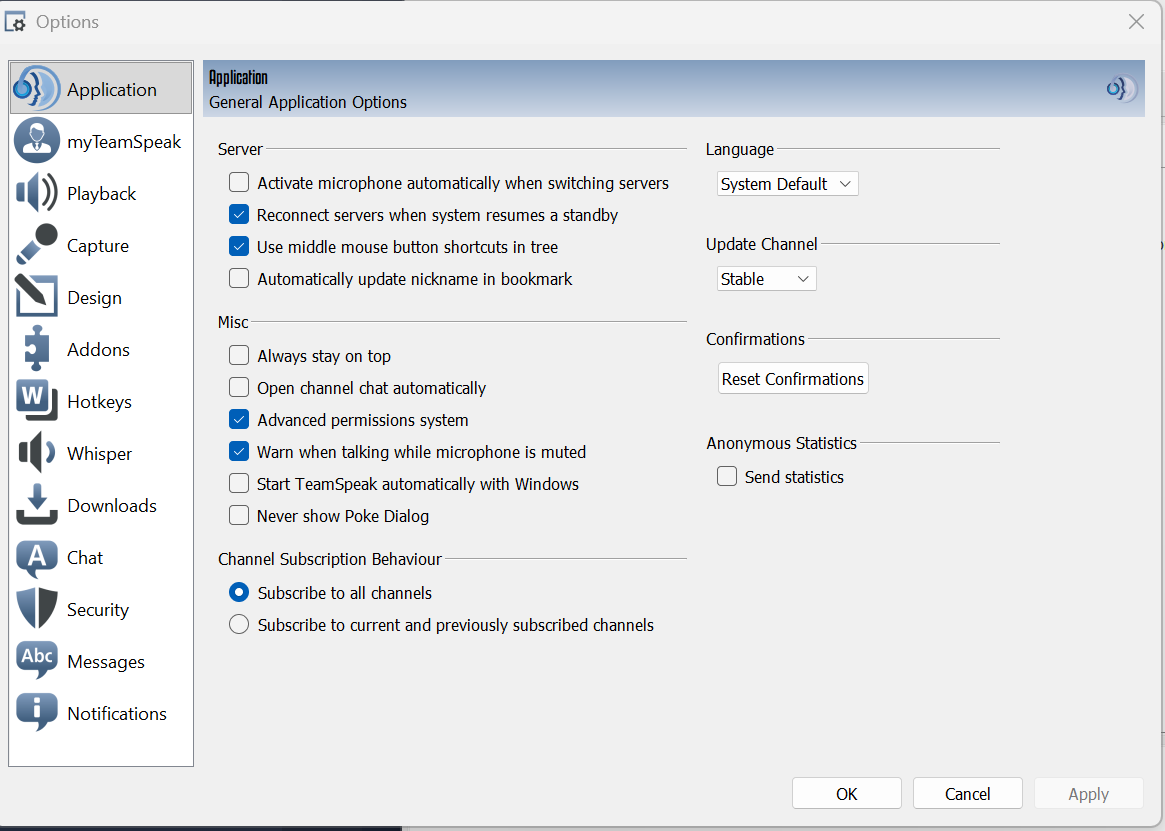
1. Enable the Advanced Permission System (Only required if using TeamSpeak 3 Client)
- Open TeamSpeak 3.
- Navigate to Settings > Options.
- Under the Application tab, locate and check Advanced permission system.
- Click Apply or OK.
2. Establish a Safe Administrative Hierarchy (Prevent Hijacking)
By default, the Server Admin group has absolute power (75). Giving other staff members this default group allows them to modify server settings, take away the owner’s admin status, or hijack ownership.
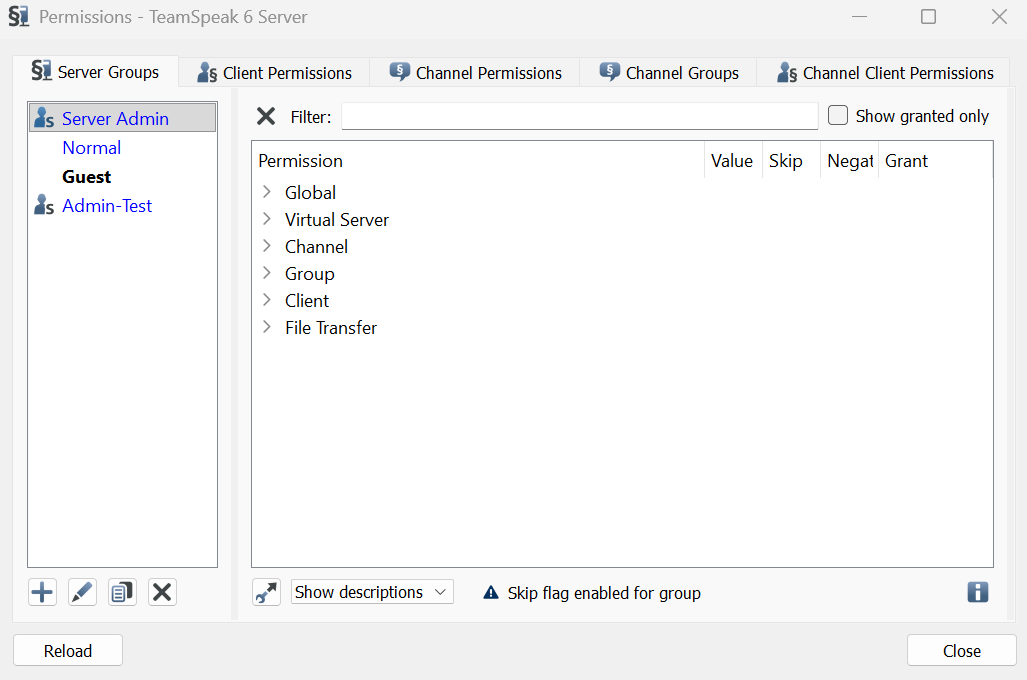
Step 2.1: Duplicate the Server Admin Group (currenty can onlt do this in ts3 client)
- Go to Permissions > Server Groups.
- Right-click Server Admin and select Copy. Name the new group Admin (or Sub-Admin).
- Assign distinct icons for visual identification (e.g., Red icon for the Main Owner/Server Admin group).
Step 2.2: Restrict Secondary Admin Power Levels
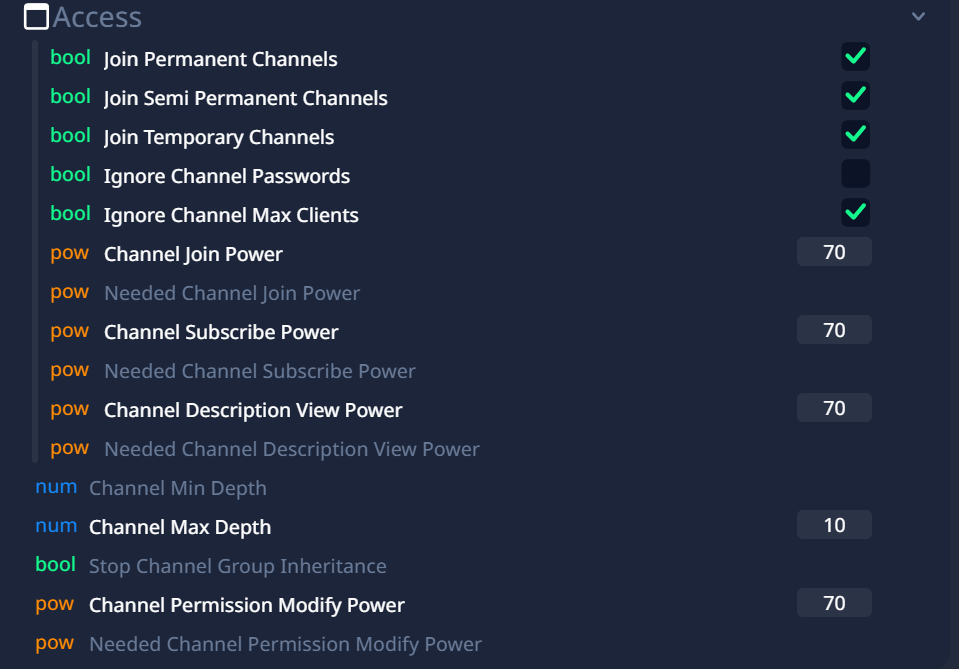
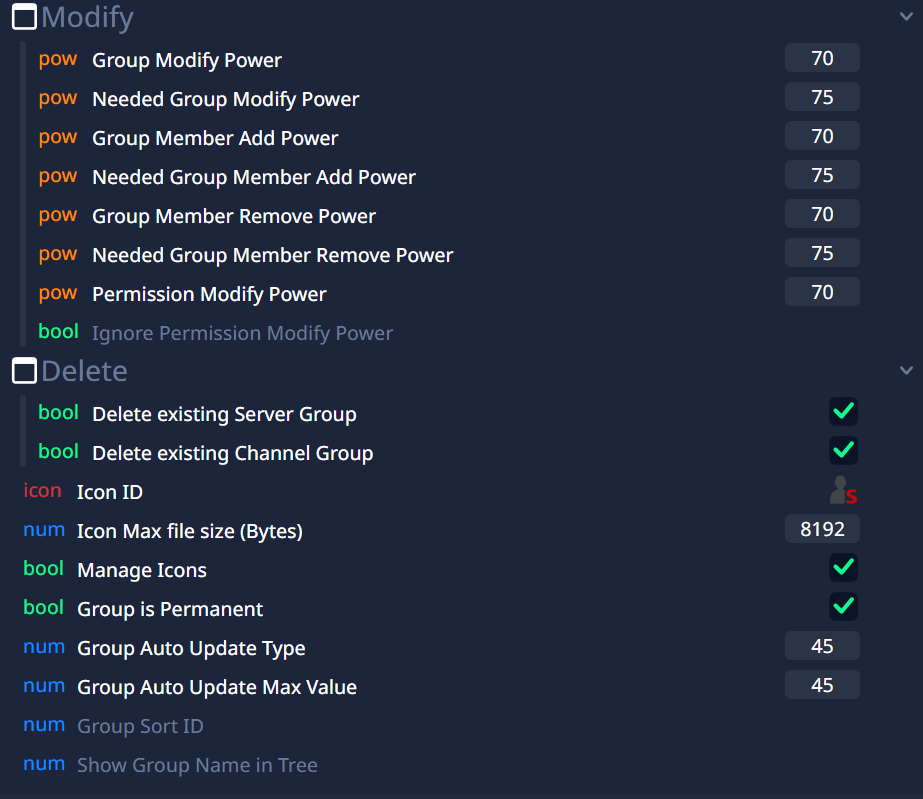
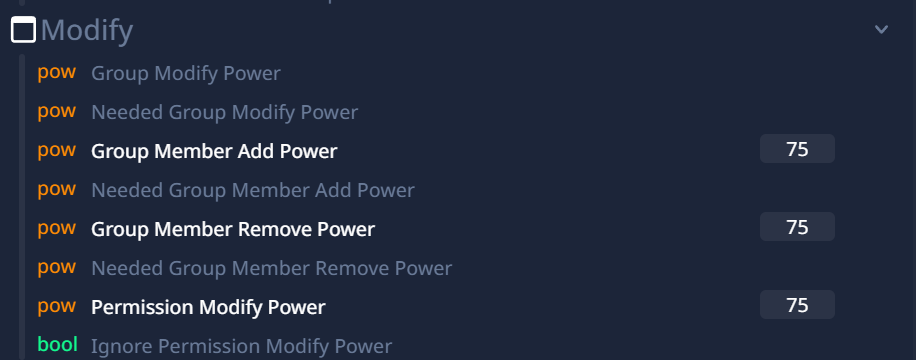
Select the new Admin group and reduce its key modify and access permissions from 75 down to 70:
- Group Permissions (
Group>Modify):- Set Group Modify Power =
70 - Set Group Member Add Power =
70 - Set Group Member Remove Power =
70 - Set Permission Modify Power =
70
- Set Group Modify Power =
- Channel Permissions (
Channel>Modify&Access&Delete):- Set Channel Modify Power =
70 - Set Channel Delete Power =
70 - Set Channel Permission Modify Power =
70 - Set Channel Join Power =
70 - Set Needed Channel Join Power =
70 - Set Needed Channel Subscribe Power =
70 - Set Needed Channel Description Power =
70 - Security Result: Secondary admins cannot modify or delete owner-protected channels/groups (set at
75), nor can they promote themselves or others to full Server Admin.
- Set Channel Modify Power =
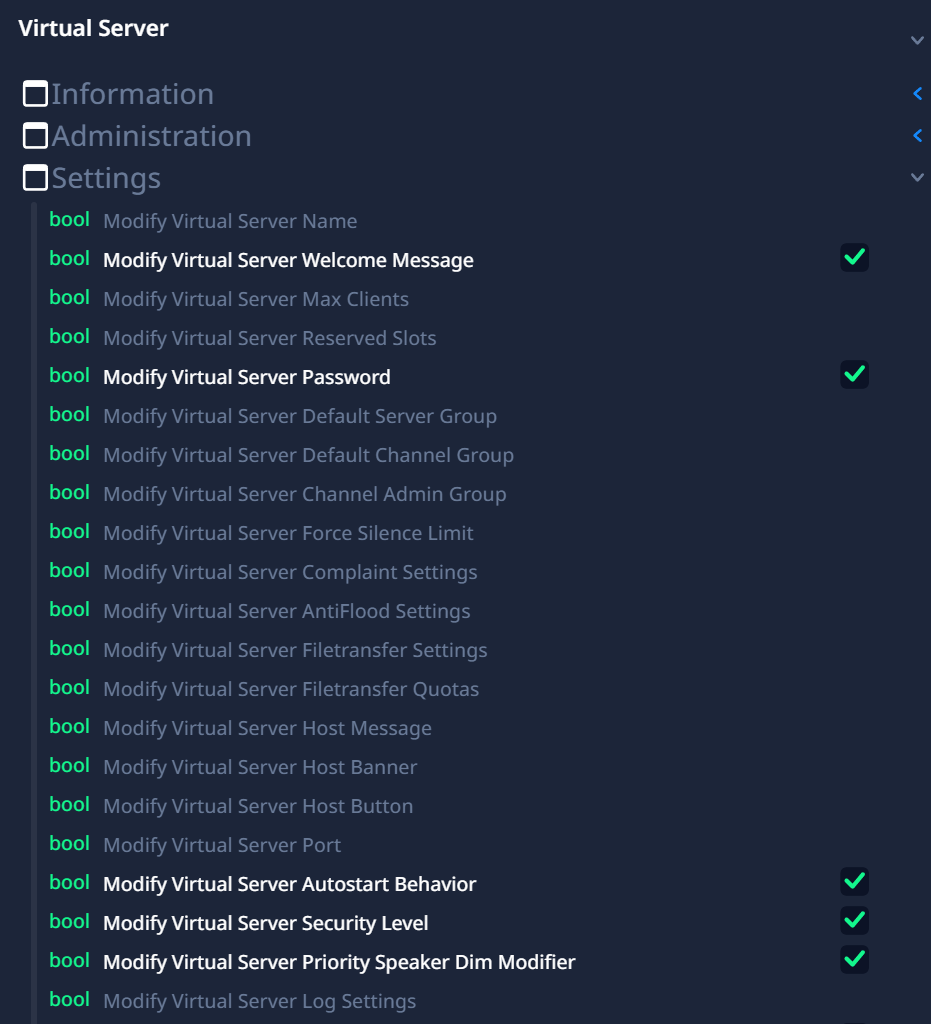
- Virtual Server (
Virtual Server>Settings) Uncheck or remove permission:- Untick/disable Modify Virtual Server Max Clients (
b_virtualserver_modify_maxclients). - Untick/disable Modify Virtual Server Name (
b_virtualserver_modify_name). - Untick/disable Modify Virtual Server Reserved Slots (
b_virtualserver_modify_reserved_slots). - Untick/disable **Modify Virtual Server
Default Server GroupDefault Channel GroupDefault Admin GroupForce Silence LimitComplaint SettingsAnitFlood SettingsFile Transfer SettingsFile Transfer QuotasHost MessageHost BannerHost ButtonVirtual Server PortServer Log Settings
- Untick/disable Modify Virtual Server Max Clients (
- Clent (
Client>Administration)- Set Client Kick From Server Power =
70 - Set Needed Client Kick From Server Power =
75 - Set Client Kick From Cannel Power =
70 - Set Needed Client Kick From Cannel Power =
75 - Set Client Ban From Server Power =
70 - Set Needed Client Ban From Server Power =
75 - Set Client Move Power =
70 - Set Needed Client Move Power =
75 - Set Client Complain Power =
70 - Set Needed Client Complain Power =
75 - Remove PermissionDelete Own Ban Rules
- Remove Permission Delete Own Ban Rules
- Set Client Kick From Server Power =
- Clent (
Client>Basic)- Set Private Textmessage Power =
70 - Set Client Talk Power =
70 - Set Client Poke Power =
70 - Remove PermissionClient Wisper Power
- Remove Permission Needed Client Permission Power
- Set Private Textmessage Power =
- Clent (
Client>Modify)- Set Client Permission Modify Power =
70 - Set Needed Client Permission Modify Power =
75 - Remove PermissionSkip Client Group & CHannel Permission
- Set Client Permission Modify Power =
- Clent (
Client)- Remove Permission*Client Permission Modify Power
Step 2.3: Revoke Dangerous Bypass Flags
- Under Client:
- Untick/disable Skip Channel Group & Channel Permissions (
b_client_skip_channelgroup_permissions).
- Untick/disable Skip Channel Group & Channel Permissions (
- Under Channel > Access:
- Untick/disable Ignore Channel Passwords (
b_channel_join_ignore_password). - Security Result: Secondary admins are forced to respect channel passwords and cannot barge into secure private channels.
- Untick/disable Ignore Channel Passwords (
Step 2.4: Block Backdoor Access & Privilege Key Exploits
- Under Virtual Server Administration:
- Untick/disable Create New Privilege Key (
b_virtualserver_token_add). - Untick/disable View List of Available Privilege Keys (
b_virtualserver_token_list).
- Untick/disable Create New Privilege Key (
- Under Group Information:
- Untick/disable View List of Client Permissions (
b_client_permission_list). - Ensure individual client permission editing (
b_client_permission_modify) is restricted/disabled. - Security Result: Admins cannot generate secret admin tokens or grant hidden permissions directly to individual accounts.
- Untick/disable View List of Client Permissions (
Step 2.5: Configure Moderation Powers & Feature Grants (Client)
- Set Kick Power, Ban Power, Poke Power, Talk Power, and Private Message Power to
70. - To allow secondary admins to manage features without full power, set the Grant value to
70for:- Priority Speaker (
b_client_is_priority_speakerGrant =70) - Icon ID (
i_icon_idGrant =70) - Group Sort ID (
i_group_sort_idGrant =70)
- Priority Speaker (
- Under Max Ban Time in Seconds, enter a numeric limit (e.g.,
86400for 24 hours) to prevent secondary admins from issuing permanent bans.
Step 2.6: Emergency Owner Lockout Prevention
- As the main Server Owner, right-click your own name > Permissions > Client Permissions.
- Assign yourself
75power explicitly for Group Member Add Power, Group Member Remove Power, and Group Modify Power.- Security Result: If you ever accidentally remove your own Server Admin group, you retain client-level authority to re-assign yourself back into the group.
3. Pre-Configure Channel Group Permissions
- Go to Permissions > Channel Groups.
- Select each real, non-default Channel Group (e.g., Voice, Operator, Channel Admin — excluding default Guest).
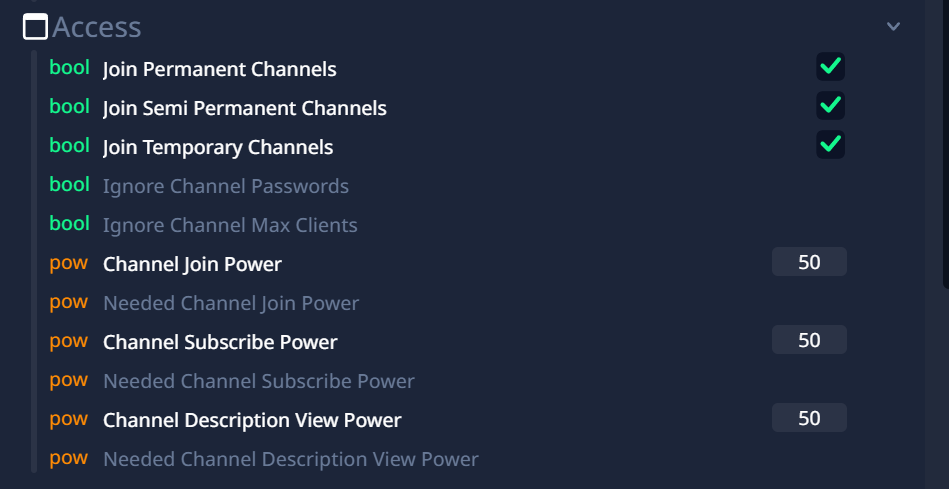
- Under Channel > Access, enable all three join permissions:
b_channel_join_permanent(Join Permanent Channels)b_channel_join_semi_permanent(Join Semi-Permanent Channels)b_channel_join_temporary(Join Temporary Channels)
- Set Channel Join Power =
50and Channel Subscribe Power =50for assigned groups (e.g., Voice).
4. Lock Down Channels & Hide Occupants (Zeroing Channel Power)
To secure a channel so that unauthorized users cannot enter or see who is inside:
Step 4.1: Forcefully Revoke Channel Join & Subscribe Power (Teampeak 3 Client)
- Right-click the target channel and select Channel Permissions.
- Under Channel > Access:
- Enable
Join Permanent,Join Semi-Permanent, andJoin Temporary, then untick/disable them. - Set Channel Join Power to
0and untick/disable it. - Set Channel Subscribe Power to
0and untick/disable it. - Result: Channel-level zero power overrides any server group subscribe/join power held by a client, instantly vanishing channel contents from their view.
- Enable
Step 4.2: Set High Channel Power Requirements
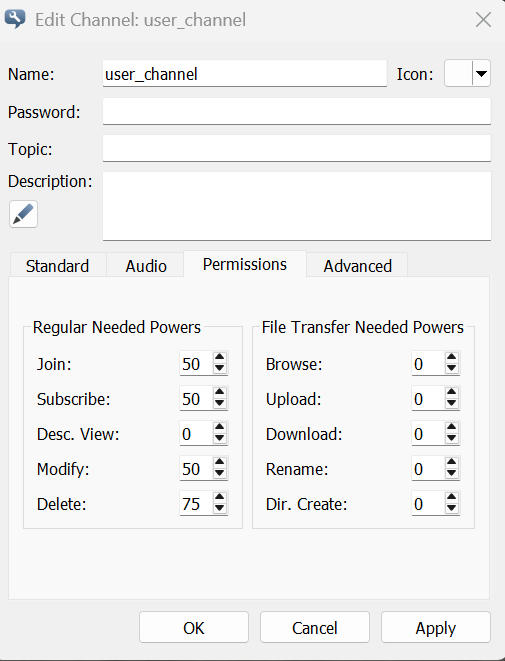
- Right-click the channel and select Edit Channel (or adjust in Channel Permissions):
- Needed Channel Join Power: Set to
50(or75for Owner-only channels). - Needed Channel Subscribe Power: Set to
50(or75for Owner-only channels).
- Needed Channel Join Power: Set to
- Save changes.
- Result: Outside users see the channel as completely empty. Occupant lists and movement notifications remain invisible.
5. Grant Access to Specific Members
To give a specific user entry and visibility into a locked channel:
- Drag the user into the secure channel.
- Right-click the user, navigate to Set Channel Group, and assign a non-guest group (e.g., Voice).
- Hierarchy Rule: Channel Group Permissions > Channel Permissions > Server Group Permissions.
- Because the Channel Group has
50Join and Subscribe power, it overrides the channel’s zero power and meets the channel’s requirement of50.
- Because the Channel Group has
6. Operational Server Settings & Privacy
- Lock Down Guest Whispers:
- Under Permissions > Server Groups > Guest, set Client Whisper Power =
-100. - Result: Prevents spammers and new users from broadcasting whisper audio server-wide.
- Under Permissions > Server Groups > Guest, set Client Whisper Power =
- Reserved Slots:
- Right-click server > Edit Virtual Server > set Reserved Slots (e.g.,
3). - Enable
b_client_use_reserved_sloton admin groups so staff can connect when full.
- Right-click server > Edit Virtual Server > set Reserved Slots (e.g.,
- Host Message Protection:
- Under Virtual Server settings, use Modal Log or None. Never use Modal Quit (it disconnects clients in an infinite loop).
- Server List Privacy:
- Uncheck Enable reporting to server list if you do not want your server publicly listed.
- Audit Logging:
- Monitor administrative actions, permission edits, and connections via Tools > Server Log.
This post is licensed under CC BY 4.0 by the author.